In his article “Apple as a Petulant Child”, Curtis McHale shares his perspective on how Apple is behaving in the wake of the EU ruling with regard to the Digital Markets Act, and in general lately.
“I want to like Apple devices. The software is good. The hardware is even good, unless we talk about repairability. […] The only viable tablet I’ve found is the iPad family of devices from Apple. Yet watching the moves that Apple continues to make that are customer hostile I get more and more hesitant to purchase future devices from them.”
I share his discomfort. I once was an Apple fan. While I switched my desktop machine and my laptops from Mac to Linux a few years ago already, I’m still using an iPhone and two iPads both for work and leisure. I used to replace my iPhones and iPads with newer models occasionally, but my reluctance to keep doing so is growing.
I thought about going for an iPhone Pro Max next time because of its bigger screen. I do a lot of reading on my phone, and font size has become a concern that younger me didn’t know. But at the eye-watering price of a big iPhone, I’d rather support Framework’s efforts of making tech more sustainable by buying their 13” laptop. My business is paying for my phone, but I just can’t see myself spending laptop money on a phone.
I’m also losing interest in the iPad. Even the iPad Pro in its latest Apple Silicon incarnations is still way behind the initial promise of a workstation in a tablet form factor. After all these years, we’re still getting just a larger iPhone with only a few concessions made to make better use of the screen real estate.
Curtis speaks to my heart when he concludes that “the decisions from Apple in the last number of years have turned me from an enthusiastic Apple customer into a reluctant Apple customer. If we keep up this trajectory I’ll be a never again Apple customer.”
That’s why I first switched to Windows and finally to Linux as my desktop OS. And now I’ve started to look at greener phone pastures as well, currently over on the Google Pixel side of the fence. I’m hearing good things about GrapheneOS.
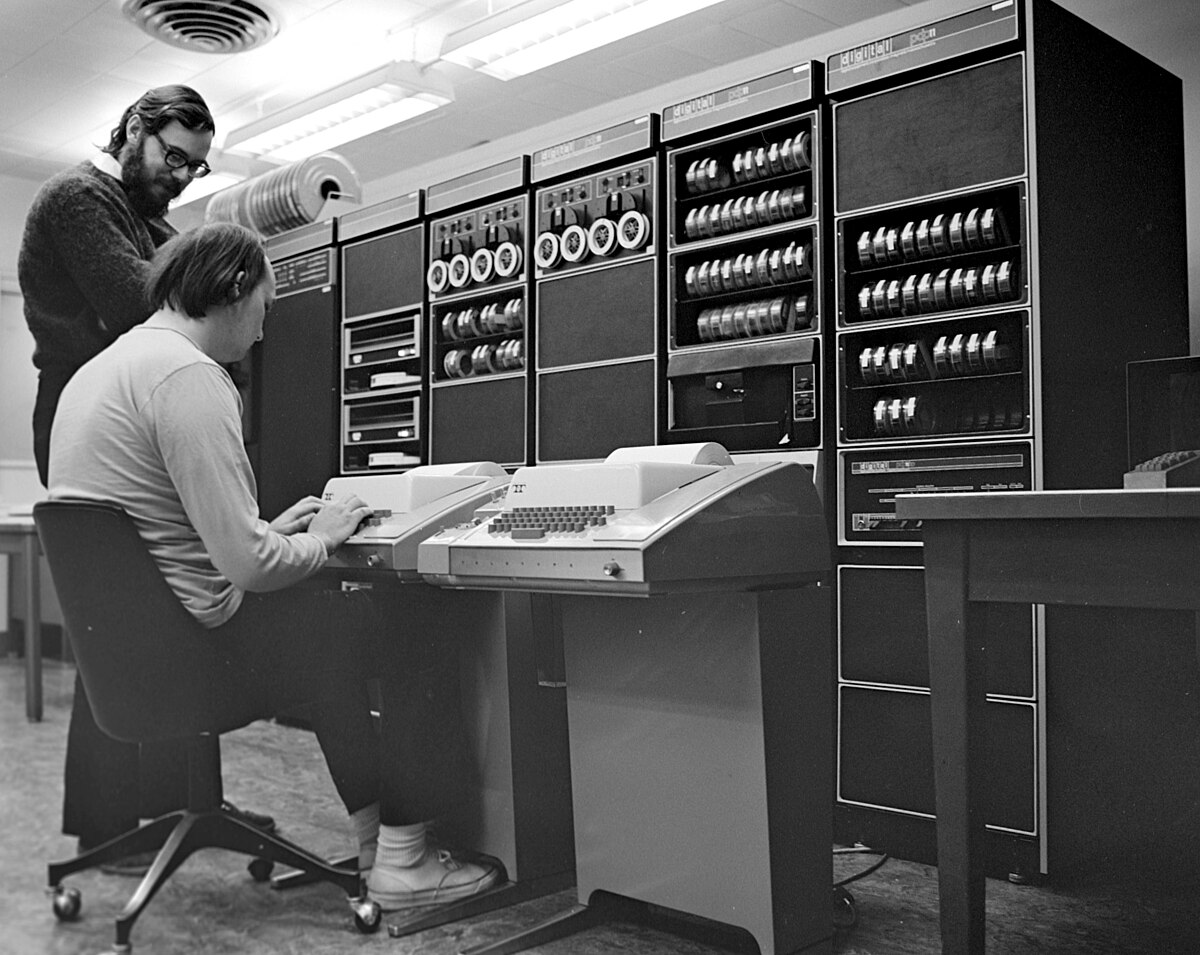
On a side note, the only critique I have on Curtis’ article is that the Apple II was considered a microcomputer, not a minicomputer. In the 1970s, a minicomputer was just one step down in size from what was initially the only type of computer, the room-filling mainframe. A minicomputer, on the other hand, now “only” had the size of a living room cabinet. One of the most popular minicomputer models was the DEC PDP-11. Dennis Ritchie and Ken Thompson used one to develop UNIX at Bell Labs. (The story how they navigated corporate bureaucracy to get one is pretty funny, actually.) Here’s a famous photo of them working at the teletype console of the PDP-11 in the background. The teletype would fit on a desk, but the computer not so much.
]]>The AeroPress is a popular coffee brewing device shaped like a huge syringe that uses a combination of immersion and pressure to create a rich and smooth cup of coffee. It consists of a plastic chamber, a screw-on filter cap and a plunger with a rubber seal. It comes with paper filters, but I replaced them with a reusable metal filter. I’m using the “inverted” brewing method in which I stand the AeroPress on the plunger handle, with the open chamber already on top. I grind 18g of beans (which I get via a Badger & Dodo subscription, add the coffee to the chamber along with 100g of hot water, stir the mixture, put the filter cap on and let the coffee extract for 90 seconds before I turn the AeroPress over on my cup and press the plunger down. The result is a strong, clean and flavorful coffee that I enjoy with frothed milk.
Recently, my fun of brewing started to get spoiled by the rubber gasket not creating a proper seal any more. I noticed a few drips of coffee running down the plunger during the extraction phase, and when I pressed it down upon my cup, the air in the chamber came out upwards around the gasket instead of down through the filter.
I went and researched replacement gaskets, and they’re only $10 on aeropress.com. But since we’re quite the “zero waste” family, I asked my wife if she had another idea. She did!
The first solution is to “massage” the gasket, ideally right after brewing when it’s still warm. Simply press the gasket down on a hard surface, and rotate the plunger at a slightly tilted angle to exercise the edge of the gasket. This helps counteract the shrinkage that occurs over weeks of use.
Alternatively, put the plunger in the dish washer once in a while. The heat makes the gasket expand and get back into shape. However, I wouldn’t recommend putting the chamber piece in the dish washer with the plunger, because it’ll lose the markings printed on it.
Thanks to these two simple methods, I can enjoy my daily coffee routine again without any mess. And I saved $10 that I can spend on delicious coffee beans.
]]>While there are emulators for the HP 38G, 48G+ and 48GX, my trusty HP 28S on whose software and hardware design they are based, that I bought for uni in the early 90s and am still using, isn’t available (yet?). When it’ll meet its inevitable demise, I’ll have to make do with “RPN 28x Calc”, a lovingly crafted iOS app.
I learned about MAME as an emulator software for arcade games, but it’s much more than that. The MAME community builds software replicas of all kinds of vintage hardware, including the Apple II as well as amazing synthesizers such as the Fairlight CMI IIx music workstation of the 1980s!
]]>Imagine my surprise when I listened to the Late Night Linux podcast and learned that the flood of images of fire hydrants and traffic lights might actually be caused by my use of Pi-hole!
If that’s the case, may I suggest that Google change the prompt from “Are you a robot?” to “Are you a valuable ad target?”
]]>The problem the person wanted to solve was testing the logic Mastodon uses for verifying the ownership of a user’s websites.
For details on how Mastodon verifies websites, see the section “Link verification”
in the Mastodon user profile
documentation. In short, you have
to add a link from your website back to your Mastodon account using either a <a
rel="me" ...>
link in the page body or a <link rel="me" ...>
reference in its
header.
Ideally, this test would use the original Mastodon codebase to make sure it worked across application updates.
On my live stream, I first attempted to write a
standalone script. My thought was to instantiate the VerifyLinkService
class
from
app/services/verify_link_service.rb
.
I was hoping I’d get away with requiring a few dependencies from the Mastodon
application, and maybe replacing a few classes with mocks. But I quickly ended
up including ActionSupport
and the kitchen sink, which made this approach
unviable.
In order to use the original verification code, I had to to run it in the context of the Mastodon application. The easiest way to do this is using the Rails console. However, spinning up a Rails console requires a working Rails application–database and all. Before I describe how to solve this, let’s first build the code we’re going to run inside the Rails console to test the verification.
Maybe I would have been able to use the original VerifyLinkService
class with
a few tweaks, but after closer inspection, I was actually only interested in its
methods perform_request!
and link_back_present?
. One fetches the website in
question, the other checks if it contains a valid link back to Mastodon.
Unfortunately, both methods use instance variables set in the constructor using
Mastodon user data. And, to make matters worse, they’re (rightfully) private
methods, which meant that nobody is allowed to call them. And just when I told
my viewers, “Well, nobody but the class itself, of course”, inspiration hit me:
Not only a class is allowed to call its private methods, but also its child
classes! All I had to do is create a subclass of VerifyLinkService
, provide
our test details in its constructor, and call the two methods required to
execute the verification. This is what I ended up with:
class ManualVerifyLinkService < VerifyLinkService
def initialize
@link_back = "https://mastodon.social/@geewiz"
@url = "https://www.geewiz.dev"
end
def check
perform_request!
if link_back_present?
puts "Verification successful."
else
puts "Verification failed."
end
end
end
This left the problem of getting Mastodon running. The fastest way to run a
Rails application with its auxiliary services and not have to do lots of manual
installation is generally with Docker containers, and Mastodon is no exception.
Conveniently, the Mastodon code repository already comes with a
docker-compose.yml
definition that contains everything we need. I found a
How-To
on the web that describes the launch process well. All I had to do was follow it
until, and including, the step where the whole setup is started by the
docker-compose up -d
command.
In this state, I was able to launch a Rails console inside the already running web application container:
docker-compose exec -it web bundle exec rails console
Into this console, I pasted the definition of my ManualVerifyLinkService
class from above.
And finally, I was able to execute the verification by instantiating an object
and calling its check
method:
v=ManualVerifyLinkService.new
v.check
Since my website is already verified by Mastodon, the result was positive.
This was a fun experiment, and as is often the case when I help someone, I’ve learned something myself in the process.
]]>Discovering my early works – In the back of a cupboard, I found the printed specification and software code of one of my first professional works. It’s a maintenance scheduling application that I developed in Clipper 5.01, a database language for MS-DOS, as a summer intern at the nuclear power plant near my home town. It has a text-based windowed user interface, as was common in the time before Windows gained ground. The printout is dated 1992-03-09. 30 years ago.
More fun with Linux – By now, I’m doing almost all my computing on my Linux desktop, gaming and music being the lone exceptions. With only my very dated experience from before I switched to the Mac in the early 2000s to draw from, I had a lot of pleasant surprises in recent months, for example when my HP WiFi Laser Printer was automatically set up, when I was able to cleanly import documents from Word into Libre Office, or when configuring my Logitech devices only required installing a little app, if at all. In the coming weeks, I’m going to try if Bandlab or Bitwig can reduce my dependency on Windows even more.
Starting work on online courses – I miss teaching, so I’ve started setting up a learning products and community website over on opsitive.com. Sadly, I haven’t made much progress on creating actual course materials so far. In part, that’s because of time constraints, but I feel that it’s more because I’ve been aiming too high too early. That’s why I’ve decided this week to start with small, free course offerings that don’t require a huge time commitment, neither from me nor from the course participants. The big Ruby and Linux Shell courses will come later when I’ve hit my stride.
Interesting reads – Here’s a few links to articles I’ve enjoyed recently:
Thanks for reading, have a great weekend!
]]>Apart from its simplicity, what makes bore
interesting is that its connection
server can be self-hosted. That way, you’re in full control of who can create or
access tunnels on your private bore
instance. You can even require
authentication using a pre-shared key.
And of course, just like seemingly all nifty command line tools these days,
bore
is written in Rust.
I set up the machine with Manjaro Linux in my office, but I had to solve the problem of later installing and upgrading software after the laptop was handed over. It’ll always access the internet from a private network behind a router, and therefore will not be visible for me from the outside. And I certainly don’t want to commute to Dublin, where we book a coworking space for our interns, every time maintenance is required.
In the end, I chose a minimalist approach by using ngrok
. This nifty command
line tool, paired with the online service at ngrok.com,
allows developers to create network tunnels with an endpoint on the public
internet. Its main purpose is for web developers to share access to an
application running on their personal machine. In other words, it allows people
with whom you share the connection details to connect their web browser to your
development laptop, even if it’s inside a closed WiFi network. However, ngrok
extends this functionality beyond the HTTP protocol and port 80.
When our intern asked me to install Discord and VS Code earlier today, I asked him to run a simple command and tell me the tunnel endpoint address. The command was:
ngrok tcp 22
It sets up the network tunnel as well as a local website on which it lists the
details of each connection. Our intern then gave me the listed address
tcp://0.tcp.ngrok.io:14463
, from which I constructed an SSH command:
ssh -p 14463 geewiz@0.tcp.ngrok.io
Within a second, I was logged into his laptop. A few minutes of installing new packages and upgrading existing ones later, I was done and asked him to cut the connection. It doesn’t get much simpler than that, does it?
]]>I also noticed a few things that I can do better next time, so in the end everyone learned something today!
We’ll continue the workshop next Friday at 4pm GMT.
]]>